iSchoolapps.com.au

How to Guide to enable your Group Notifications
Available on:
- iOS
- Android
Please confirm with iSchoolApps that your App is up to date
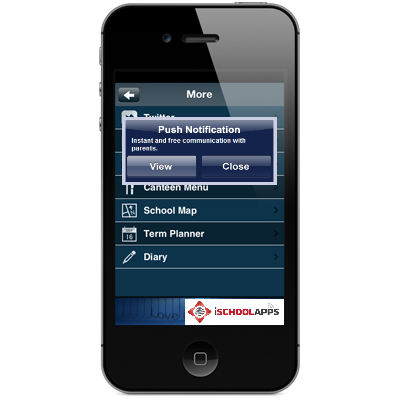
The iSchoolApps Messages tab serves as your users’ “storehouse” for received push notifications. It allows users to refer back to previous push notifications they may have missed at receiving time.
From within the tab, users can view plain text, template, and linked push notifications’ content. They just need to click a message to view the details.
How-To
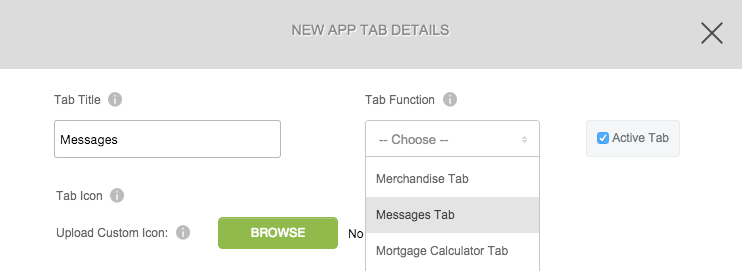
1. In Step 1 (Functionality), click Add New Tab.
2. Create a Tab Title, select Messages Tab from the Tab Function drop-down, and choose an icon or upload your own. Save your changes. (You can change all this information later.)
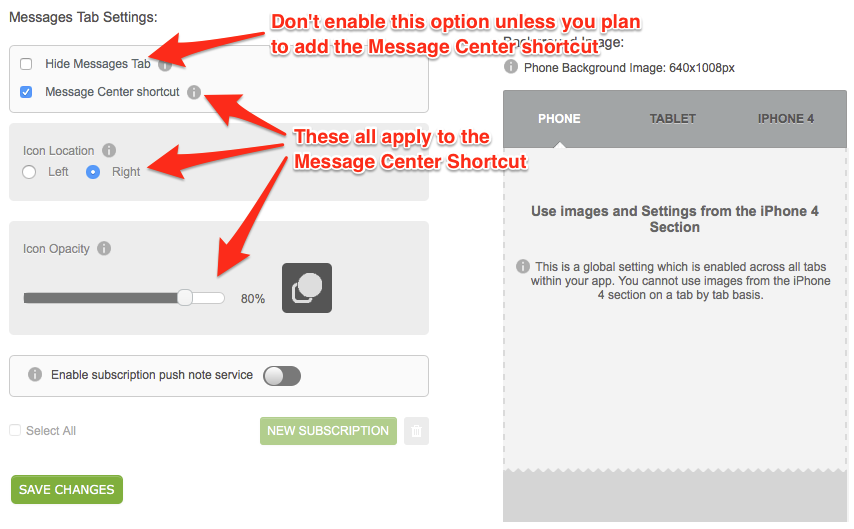
3. Go to Step 2 (Content) and click on your new tab. Here you can adjust your tab’s settings. Click Save Changes when you’re done.
- Hide Messages Tab: This option will prevent the Messages tab from appearing within your app. You should only check this box if you also plan to enable the Messages Center shortcut below.
- Message Center shortcut: Checking this box will place a shortcut to the Messages tab at the top of your app’s home screen.
- Icon Location: If you’ve enabled the shortcut, select where you’d like it to appear (at the top left or top right of your home screen).
- Icon Opacity: If you’ve enabled the shortcut, you can adjust its opacity here. The farther to the right, the more opaque (visible) the shortcut will be.
Subscriptions
In an effort to both improve the messaging clarity to app users and create a way to help deter users from turning off your applications push notes because of spam we have built a new feature that allows users to essentially ‘mute’ categories of messages.
We call these categories subscriptions and with them you can now inform those interested in certain aspects of your business without spamming those who are not.
To create and manage your subscriptions, head over to your Messages feature.
Turn on subscriptions via the toggle as shown below.
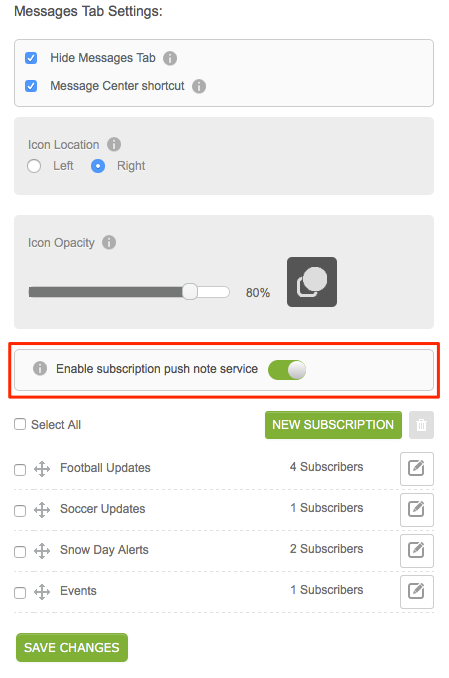
Now you will be able to click ‘New Subscription’.
Here you will be presented with a simple text field to title your subscription.
You can also organize the order of these by drag and drop.
If you take a look at the image above you can see how many users have each subscription turned on.
Notes*:
By default, subscriptions are all enabled in a newly installed app. This will ensure at first users will not miss out on any messages.
When messages are sent they will still be displayed in the messages list regardless of the subscriptions settings. The settings are simply to turn off (mute) the push notification prompt from alerting of the new messages.
When users first navigate to the messages tab with subscriptions enabled they will now see a new gear icon on the top right. On first visit, they will also see a notification overlay describing what the gear icon does and to bring attention to it.
Users can then toggle off the subscriptions they do not wish to receive updates to, then save their changes.
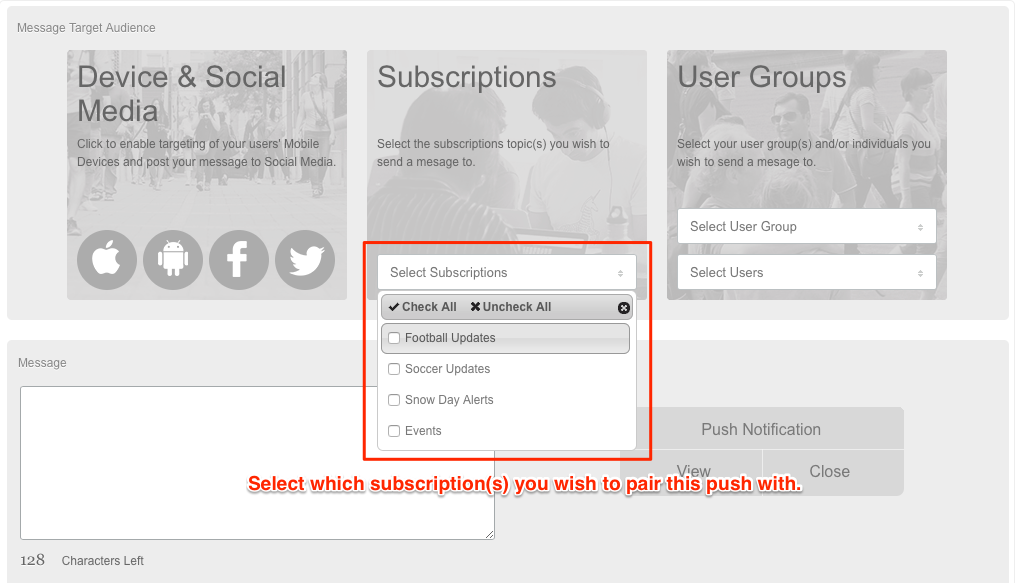
When sending push notes you can now select from your Subscriptions offerings.
If you choose not to select any, the push notification will go out to ALL users, even if they have all subscriptions turned off (This of course does not override the device targets or user groups selections).
4. That’s it! You’re all done at this point. Once your app is live, you’ll be able to view your received push notifications within your Messages tab.
Message Center Shortcut
The shortcut that appears on the home screen of your app does not indicate how many total push notifications the user has received since they last checked the Messages tab. Rather, the indicator will display a bouncing number when the user receives a push notification while browsing inside the app. For instance, if I’m browsing your app while you send a push notification, then my indicator will display a “1” to alert me that I missed one message while viewing the app.
The indicator is intended to alert users who failed to receive a visible push notification. Any users who were outside of your app when you sent the message would have seen a pop-up, a banner at the top of their phone screen, or a badge on their app icon. This all depends on their personal notification settings, of course! The indicator won’t appear & bounce for those users, because it’s assumed they’ve already viewed the message.
Deleting Messages From the Back-End
Through the Messages tab, users can delete previously received push notifications from their device. These messages are stored “locally,” on the device itself, so when they trash a message, that action only applies to their own tab.
However, from the Push Notifications section of your dashboard, you can also remove scheduled & previously sent push notifications.
1. When logged into the app, visit the Push Notifications section of the dashboard.
2. At the bottom right of the pop-up window, click the up arrow to reveal your messages log.

3. Find the message you’d like to delete in your log. You’ll see a Scheduled section if you have upcoming, scheduled messages. Otherwise, you’ll just see a History section.
4. Click the gray X to the right of a message to delete it. (Note: If you delete a scheduled push notification, it will no longer send at its scheduled time.)

iSchoolApps.com.au